Help (also available in the application)
Index
1. Initial options
2. Program general interface
2.1. The Explorer
2.1.1. Accessing folders and viewing/executing files
2.1.2. Selecting Viewmode and Order
2.1.3. Filesystem actions (move, copy, rename, delete)
2.1.4. Undo
2.1.5. Fast access to folders
2.1.6. Refresh
2.2. Tags
2.2.1. Create a new tag
2.2.2. Edit/Remove tag
2.2.3. Adding tags to elements
2.2.4. Erasing tags from elements
2.2.5. Copying all the tags from an element to other elements
2.3. The Searcher
2.3.1. Searcher options
2.3.2. Specifying the tags to search
2.3.3. Searcher display options
2.3.4. Accessing folders and launching or viewing files/programs from searcher
2.3.5. Tagging over searched results
2.3.6. Copying and moving searched results
3. Database Management & Options
3.1. Import/export databases
3.2. Another options
1. Initial options

When application starts you must choose an existing database or create a new one.
If is not the first time you launch the program, last used database is automatically choosed and you can change it by selecting another already created database from ‘change database’ selection list, or alternatively introduce a new name in the input field near to ‘New database’ button and press it or press enter.
If is the first time you launch the program you must enter a new name in the mentioned input field.
Each database is associated to a drive unit like ‘C:’, ‘D:’, ’G:’, etc. (in Windows) or ‘/’, ‘/media/user/externaldrive’, etc. (in Linux), or ‘/Volumes/yourdrive’ (in macOS) but this associated drive can be changed at any time in the options of the program, this is so that if you have the data to be tagged on an external drive everything works correctly even though the system has been able to choose another path to the drive than you used last time, or you change operating system.
So select a drive unit if you need (by default is selected the one from which the program is executed) and press ‘Launch!’ button to start.
Another buttons in the Initial options are ‘Import data’; that by pressing it you can choose a file where a database has been previously exported and import it in the database you choose, and ‘Delete database’; to delete the database you have selected.
Two switches to combine color or 'grayscale' modes with day or night modes is also available, plus a language selector, in this initial options window.
More information about import/export and databases in general options help.
2. Program general interface
After running the program and pressing ‘Launch!’ in the initial database options, the general interface of the program is started.
There are two main windows in the program; the explorer, that is launched at the beginning, and the searcher, you can go alternatively from one to another by selecting the corresponding tab below ‘tagstoo’ logotype.
The elements that will be displayed in both main windows (the elements of a directory in the explorer and the elements searched in the searcher) can be selected cumulatively using the mouse (for example several groups) also counting on the following aids:
| Ctrl-a | Alternatively selects or deselects all the items in the folder or found. |
| Shift | Selects all the elements between the penultimate selected and the last one. |
| Esc | Deselects all selected items. |
2.1. The Explorer
2.1.1. Accessing folders and viewing/executing files
To access a folder, hold down the mouse button on the folder (both in the tree view in the left panel and in the currently accessible folders in the right panel).
To open tree structure of a concrete folder in the left panel treeview simply click (without press and hold) in the folder you want.
To launch a file, that can be an executable or any kind of file, press and hold over the file you want, if it is an executable it will be executed, if is of any other kind, for example a video or a text file it will launch the viewer that it is configured in the system as default viewer for that type of file.
An extra option is available to images, so apart of system's image viewer that is launched if you press and hold mouse button over the name or any other space of the element except the image itself, if you click on the image, an internal Tagstoo image viewer will be launched.
It should be mentioned that there is also available the option to create folders clicking in the correspond icon (  ).
).
2.1.2. Selecting Viewmode and Order
There are various viewing modes, the first ‘1’ (that is initial viewmode when program start) show folder and files in a list each one in a row that have various columns; first, the icon (or mini-preview image) and name, second, second, extension of files or number of elements that contains each folder, third, size of files, fourth, tags of the element, fifth, last modified date of the element, and sixth, the length in case the file is multimedia (audio or video).
The other viewing modes, ‘2’ to ‘9’, present the elements as cards of different sizes from smallest ‘2’ to more bigger ones ‘9’.
Any of the selected viewmode can show elements ordered in the mode that can be choosed in the ‘Order by:’ selector on the top, by default elements are ordered initially by name in ascendant order (A-Z), other order options are; by name descendant (Z-A), by extension (A-Z) and (Z-A), size from small to big and from big to small, last modified from newest to oldest and from oldest to newest, number of tags form N to 0 and from 0 to N, and in an aleatory way.
2.1.3. Filesystem actions (move, copy, rename, delete)
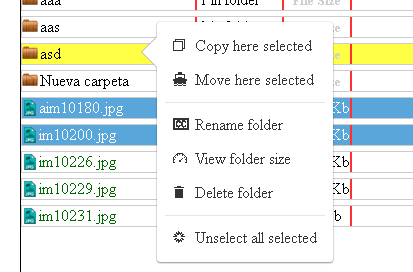
The usual actions of any file system on files and folders, that is, move or copy elements, rename or delete them, are accessible from the contextual menu by right clicking on the element or elements (if there are several selected). Other options are also available such as viewing the size of files or folders or viewing the number of sub-elements in a folder.
The actions of moving and copying can also be done by selecting and dragging the selected element or elements to the destination folder (later you will be asked if you want to move or copy).
2.1.4. Undo
There is undo for the majority of the possible actions over elements, except for delete folders or files, that is; move or copy files and folders, rename file or folder, add tag to a file, to a folder, or to a folder and its sub-elements, and delete a tag from element.
To undo the undesired action simply click on ‘UNDO’ button on the top.
2.1.5. Fast access to folders
In each database apart from information about tags also are saved fast accesses to folders routes.
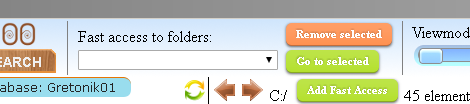
You can add a folder to this list by entering in the desired folder and clicking on ‘Add Fast Access’, so now from whereever you are if you select the folder from the list and click on ‘Go to selected’ the folder will be opened in the explorer.
Also you can delete selected folder from the list by clicking in ‘Remove selected’.
2.1.6. Refresh
There are a pair of refresh buttons, one for the treeview on the left and another to the directory view on the right, that they will refresh the content of their respective ambits.
This comes in handy if for some reason the information is not correctly visualized or if is not actualized (for example if you do a change in the filesystem with a program outside to Tagstoo, and the affected folder is open).
2.2. Tags
Tags are managed in the bottom side of the program window, and to add tag to an element simply choose one tag and drag and drop it over the element you desired.
The tags positions are interchangeable, both in the tag selector below and in each element tags lists.
2.2.1. Create a new tag
To create a new tag click on the button ‘Add New Tag’. A new window will appear with three options you can manage; the shape of the tag (choosing one of them), the color (by clicking in the circle), and the text (introducing it in the input field). You can preview result in the preview box.
Press ‘Create Tag!’ if you are satisfied with the outcome.
2.2.2. Edit/Remove tag
Here you must first select the tag you want to edit, or remove, from the previously created tag list.
If you want to edit the tag, the same options of create a new tag are available but in this case it will apply the changes over the selected tag when you press ‘Save edited tag!’ button.
If you want to delete a tag simply press ‘Remove Tag!’ after select a tag. Be careful because all associations to this tag will be lost, for security there is a confirmatory question.
2.2.3. Adding tags to elements
To add a tag to a file drag and drop from the tags listed at the bottom, to the desired file.
To add a tag to a folder you can indistinctly drag and drop the tag from bottom list to a folder on the left panel treeview or to a folder in the right panel. In both cases you will be prompted to a question if you want to add tag only to the folder or also to subelements of the folder. If you choose the last one, selected tag will be added also to elements inside folder (but not to elements inside a folder inside the folder).
You can make the program no longer ask if you want to add tag to subelements by checking the corresponding option in the options menu (see below)
It can be remembered here that you can change the order of each element's tags by drag and dropping them.
2.2.4. Erasing tag from elements
To delete the tags associated to elements, there are two possible ways; for those that are using a mouse is as simple as to click in the tag with the right mouse button, the other way is activating the tag eraser by clicking on the rubber (  icon) and then clicking over the tag or tags you want to erase.
2.2.5. Copying all the tags from an element to other elements
You can copy all tags of an element in all other elements that you want, to do this first you must have the elements where you want to copy the tags selected, and then, having the tag copier activated ( icon) click in the tag area of the element you want to copy from.
2.3. The Searcher
In this window you can perform searches of elements with desired tags.

On the left side of the window you can choose search options and add tags to any of the input fields of tags by dragging and dropping tags on them.
2.3.1. Searcher options
First option is to select in what folder make the search (that will include all elements and subfolders below this folder), by default root directory of the selected database associated unit is selected (that is ‘C:’ or ‘D:’ or whatever is it).
To change it press ‘Select to search in..’ button, and folder select window will appear.
Next and optionally you can define if the elements that you want to search (files or/and folders) must be in turn under folders that must have some specific tags.
Here you can add all the input fields that you need and in each input field you can add tags that necessarily any of the parent folder of the searched element (no necessarily the direct parent folders) must have.
Another option is what to search; folders, files or folders and files. After choosing and pressing ‘Search’ the search will be done over selected kind of element for the tags you choose.
2.3.2. Specifying the tags to search
You can add all the input fields that you need for complete your search criteria, in each input field you can add tags that necessarily the searched elements must have, and by using various of these fields you can create various conditions that the searched elements must comply and add all them to the searched results.
For example, in one field you can add tags ‘cat’ and ‘white’ and in another field you can add tags ‘dog’ and ‘brown’, so the search result will return all white cats and brown dogs.
You can add all the input that you need clicking on "add tags input field".
Below these fields exist another kind of input field that, in this case, is for add tags that the searched results must not have, in the case that it is convenient for you that you can specify some of them.
2.3.3. Searcher display options

The searcher has its own Viewmode and Order selection options, independent of the explorer, and are accessible by the corresponding selectors in the top of the search results panel. Additionally, it is possible to separate the search results into several pages with x elements searched on each page that can be selected in the corresponding selector.
Also, to the right of the search order selection there is an icon that show a sheet with text, by clicking on it you will be available to display a printable friendly view of both the current search results with their tags and a text list of the searched folders/files names that can also be saved as text file (so that can be used for example as a playlist for a external program).
2.3.4. Accessing folders and launching or viewing files/programs from searcher
When you press and hold pointer over a folder of the searched results, the folder will be opened on the explorer window.
If you press and hold pointer over a file it will be executed or viewed, as usual, by the default system viewer for that kind of files. As in the explorer, another method is added for images, that is if you click on an image the program internal viewer is launched (that have advantage that previous/next selection correspond with the images of the searched results).
2.3.5. Tagging over searched results
You can add tags to or erase tags from searched elements (and change tags order) same as in the explorer.
2.3.6. Filesystem actions on the searched elements
You can move or copy the searched elements, after selecting the appropriate option in the context menu of the right click of the mouse you will be prompted to the question if you want to copy/move the tags also. For example imagine you want to copy the searched results in apart directory or drive, for a presentation that has nothing to do with this program, in that case you can select to not copy tags.
Both in the copy and in the move actions, in the case you choose to copy/move the tags too, you must select a folder that is inside the drive that is associated to the database in that moment. On the other side, if you choose not to copy/move tags, you can choose any available folder or drive.
Probably, it will be a rare case if is choosed to move elements without tags but take in mind that in this case the tags associated to those elements will be lost.
To rename or delete elements simply select and choose the desired option in the context menu of the right click of the mouse.
3. Database Management & Options
By clicking in the options icon (the blue dentated machine piece on the top) a window with database options and general options will appear.
In this window you can change the database currently used or the drive letter associated to it, simply choosing a database from the database list (or creating a new one by putting a non-used name and clicking in ‘New database’) or selecting a drive unit from the available list (‘Change associated drive’) respectively.
When you have the desired database name selected you can click on ‘Load it’ to load that database, with the selected associated drive, in the application.
You can also delete selected database by clicking on ‘Delete database’.
3.1. Import/export databases
Another option in this window is to import from or export to file database data.
Note: The program do not require installation, so one can ask where is the data saved? Where are all tags and their associations saved if the executable don´t change and nothing is saved in the affected folders and files?. The response is: in a database that is saved somewhere inside the route ‘C:\users\%user%\AppData\Local\Google\Chrome\User Data\Default’ (in Windows) or ‘/home/%user%/.config/google-chrome/Default/IndexedDB/’ (in Linux) or ‘/Users/%user%/Library/Application Support/Google/Chrome/Default/IndexedDB/’ (in MacOS) and that is not legible for humans only for the specific program.
So, data is saved in a location that only will work for the current user in the current machine.
If you want to read the data in another session with another user, or in another machine, or you want to have the data in a file and delete the database for any reason, or simply you want to have a backup, you can export data to a file and import this file later, anywhere you want.
To export data of the selected database to a file, simply be sure that the database you want to export is the database selected (‘Currently selected database:’) and that not necessarily will be the currently opened database, and press ‘Export data’ and you will prompted to select a file (or in Windows you can also create one by mouse left-button's contextual menu) to where export the data, file can have any extension you want.
To import data select the database to where you want to import and click ‘Import data’, you will be prompted to select a file where data was previously exported, after choose the file, if the data is valid, it will be imported and it will be ready to use in the selected database.
3.2. Another options
A few other options are also available in this window:
• Toggle between COLOR, GREY, DAY and NIGHT modes; two switches to change interface colors to best fit your like.
• Confirmation on close program; that by default is deactivated.
• Check for updates on init; it will seek if a new version is available, by default is deactivated.
• Show tips when program launch; that by default is active.
• Show tooltips (inline help); that by default is active.
• Load demo tags when a new database initialize; that by default is active, but is recommended that, when you know about the basic interface, deactivate it.
• Automatically not add tag to folders subelements; by default it's deactivated, if is checked when you add a tag to a folder the program will not ask if you want to add the tag to folder subelements, and it will not add the tag to subelements.
• Don't show number of items of subfolders (faster loads); by default it's deactivated, if is checked the number of element in subfolders will not show and also only generic folder icons will be show, this causes faster folder loading times.
• Preview images and epubs on Viewmode 1; by default is deactivated, is because the miniatures are really very small on this viewmode, but for someone it can be anyway useful so this option is available.
• On image-viewer change to next image each X seconds; you can activate it to auto-change image every X seconds, to the next one, when image-viewer is launched with any image.
